Prerequesites
- A The Things Network account
- A TTGO T-Beam LoRa development board, which includes a gps module
- Available on Amazon (affiliate link)
- Available on Aliexpress
- A LoRa gateway connected to The Things Network which is in reachable distance.
- Have a look at the interactive map from TTNMapper.org to see "hot gateways in your area".
- If there is no gateway available you can always get your own
- A windows, macos or linux computer with Visual Studio Code and PlatformIO as well as git installed.
Let's get started
Once you have met all prerequesites above we can start by cloning the git repository I prepared. Then, open the cloned directory using Visual Studio Code
#clone the repo
git clone https://github.com/mKenfenheuer/LMIC-TTNMapper-Node.git
#open it with vs code
code LMIC-TTNMapper-Node
Depending on how you installed Visual Studio Code the "code" command is not available. If so, open Visual Studio Code and open the cloned repository using File > Open folder ...
Now that we have the project open, we will need to grab the credentials from the The Things Network console. To do so, login to the console, select your region and open "Applications" or "Go to applications". From there, select "Add application" to register a new application. Give it a unique identifier and optionally a name and description. Once created you will be redirected to the newly registered application. There you can see the general application information, the live data as well as all registered devices.
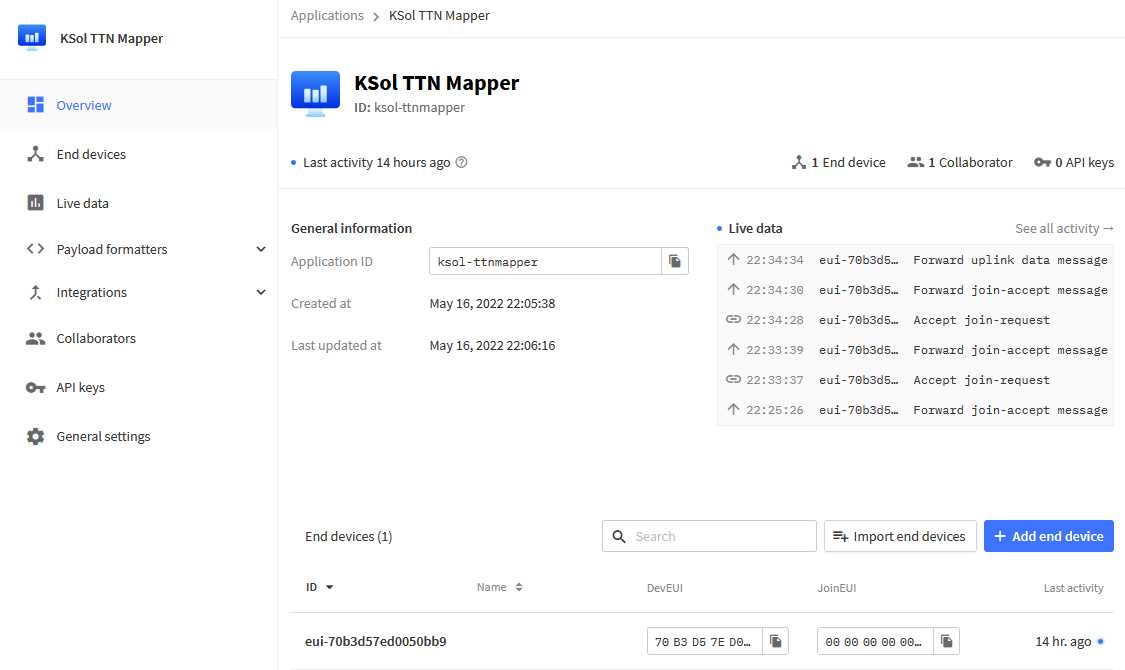
The application dashboard of your newly registered application
Click "Add end device" to register a new device. As the device is not listed in any templates, switch to the tab "Manually" to manually register a new device. Enter the following information:
- Frequency Plan to match your region: Germany uses EU868 MHz (SF9 for RX2 - recommended)
- LoraWAN Version: LoRaWAN Specification 1.0.2
- Regional Parameters: RP001 Regional Parameters 1.0.2
- DevEUI: Click generate
- AppEUI: Click Fill with zeros
- AppKey: Click generate
- End device ID: fill in a unique device id for your device
Once done, it should look similar to this:

The device settings used for the development board
Click "Register end device" to register your device. You will be redirected to your newly created device. To easily insert the keys into our application, we will need to toggle the array formatting by clicking the "<>" button below and by clicking the "msb" button left to the "<>" button to reverse the byte order of the DevEUI and the AppEUI from most significant byte first to least significant byte first. Do not switch the byte order of the app key. We can leave it as is, we only need to change the array formatting there. Afterwards it should like in the following screenshot:
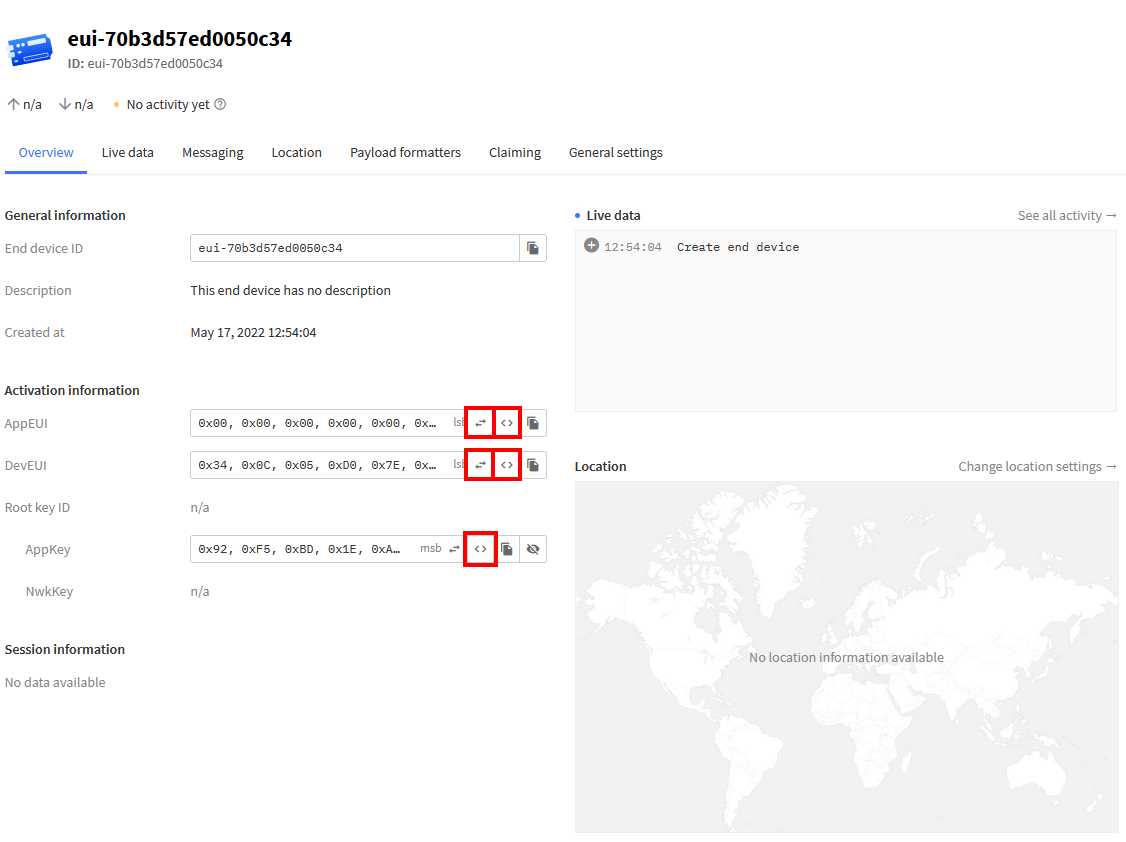
The device credentials in correct format and byte order
Note the "0x" formatting of the bytes and the "msb" and "lsb" indicating the byte order. The buttons you would need to click once are marked red.
Once you have the keys properly formatted and ordered, go back to Visual Studio Code and copy the file "keyfiles/lorawan-keys_example.h" to the same directory and rename it to "lorawan-keys.h".
Now copy the DevEUI, AppEUI and AppKey from the The Things Network console to the respective definitions in line 40, 42 and 46. The result should look like this:

The device credentials inserted into the lorawan-keys.h file
Depending on the version of the TTGO T-Beam, the serial rx and tx pins of the gps module and the board version may vary. To change them, edit the lines 84 and 85 for the gps pins of the file "platformio.ini". To change the board version uncomment one of the lines 48 and 49 for the board version. Do both depending on the information you received from the reseller. If you bought the board from one of the links above, you can leave the board selection and the gps pins as is. If you would like to change the frequency of the messages, edit the line 83 of the file "platformio.ini" 60 seconds is the default value. Please keep in mind to follow the fair use policy. From my point of view, 60 seconds is a good starting point, going below 60 seconds does not make much sense.
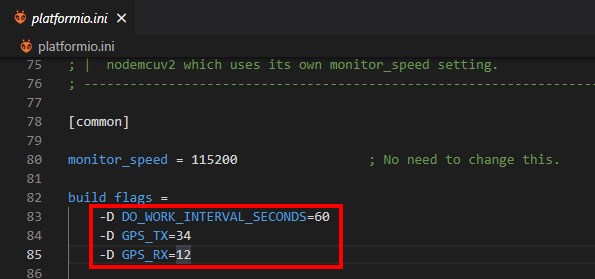
Selecting the gps tx and rx pin assignment
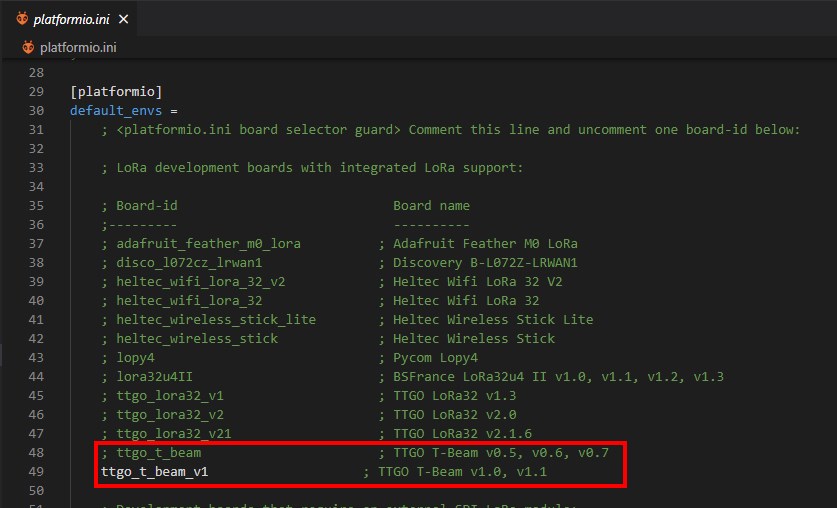
Selecting the board version
To compile and upload the firmware to your device, open the platformio extension menu by clicking the alien icon in the left pane. Then, expand the board "ttgo_t_beam_v1" or "ttgo_t_beam" depending on which one you purchased. (Again, if you purchased using one of the links above, select "ttgo_t_beam_v1"). A list of possible tasks will open, then select "Upload and Monitor"
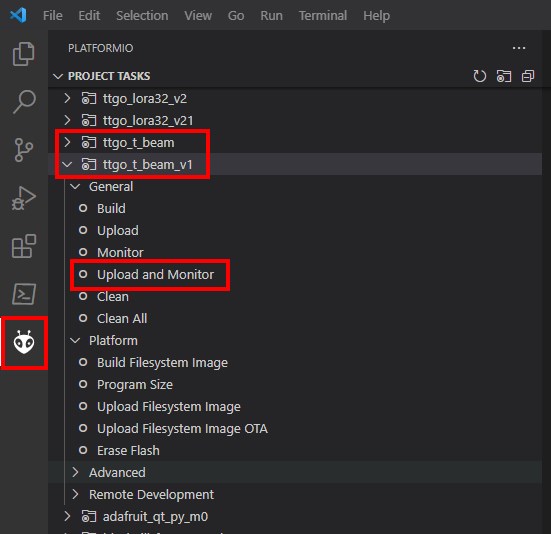
Upload the firmware to your device
The firmware will be compiled and uploaded to your device. If the process was successful you will see below message shortly and the serial monitor will start.

Successful compliation and upload of the firmware
Your device will now reboot and will then try to join the The Things Network. A successful boot and join process will look like this:
LMIC-node
Device-id: ttgo-tbeam-v1
LMIC library: MCCI
Activation: OTAA
Interval: 60 seconds
000000057395: Event: EV_JOINING
000000057437: doWork job started
000000434552: Event: EV_TXSTART
000000755546: Event: EV_JOINED
Network Id: 19
Device Address: 260B4BCA
Application Session Key: 7E-05-DD-27-58-21-AE-CA-F2-B6-81-D1-10-6D-39-F5
Network Session Key: 9C-20-B7-BE-AD-F1-7F-AF-16-DC-73-66-04-E7-D6-29
000000756398: doWork job started
000000756597: Lat: 0.00 Lng:0.00
000000756597: Uplink not scheduled because gps fix pending
In the above example there is no uplink message scheduled as there is no gps fix right now. Take the device outside and leave it there for a few minutes. Once it a red led starts to blink the gps module has acquired a fix. From now on, the device will transmit its position every 60 seconds via LoRaWAN to The Things Network. You can see incoming messages in the live view of your registered device as shown in the screenshot below:

A received message from the device
There is just one problem: The Things Network does not know how to interpret the messages from your device, as they are encoded and transmitted in byte format. To fix this, go to your registered application in the The Things Network console, expand "Payload formatters" on the left and select "Uplink". Set the formatter type to "Custom javascript formatter" and paste the contents of the file "decoder.js" inside the source directory. For convenience, you can also use the code below:
function decodeUplink(input) {
var bytes = input.bytes;
var decoded = {};
decoded.latitude = ((bytes[0]<<16)>>>0) + ((bytes[1]<<8)>>>0) + bytes[2];
decoded.latitude = (decoded.latitude / 16777215.0 * 180) - 90;
decoded.longitude = ((bytes[3]<<16)>>>0) + ((bytes[4]<<8)>>>0) + bytes[5];
decoded.longitude = (decoded.longitude / 16777215.0 * 360) - 180;
var altValue = ((bytes[6]<<8)>>>0) + bytes[7];
var sign = bytes[6] & (1 << 7);
if(sign) decoded.altitude = 0xFFFF0000 | altValue;
else decoded.altitude = altValue;
decoded.hdop = bytes[8] / 10.0;
decoded.sats = bytes[9];
return {
data: decoded,
warnings: [],
errors: []
};
}
Click "Save changes" and go back to the live view of your device. The next messages will be parsed correctly and will show the gps data in the message log as shown in below screenshot:
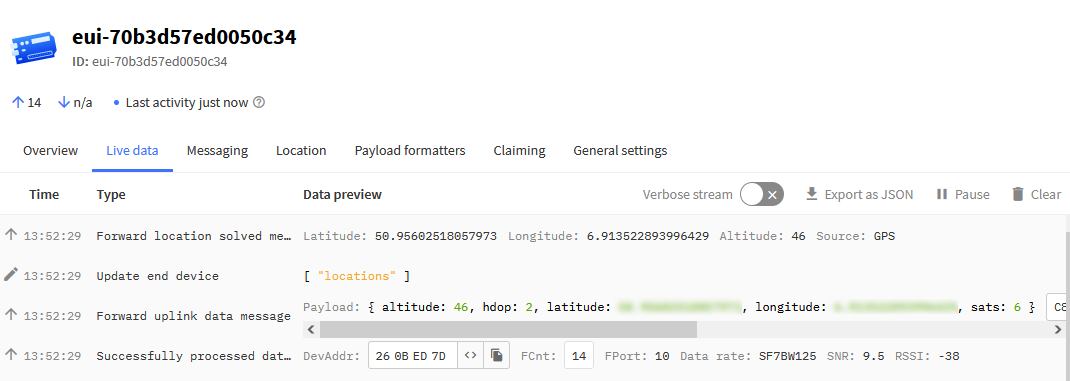
Moreover, The Things Network provides a neat little feature: it shows the devices location in the devices dashboard. Go back to your registered device and you will see its location on a map as shown below:

And thats it! You have successfully connected a LoRaWAN GPS Tracking device to The Things Network. As a next step, you can connect your registered application to the community project TTNMapper to map coverage of the gateways and the The Things Network in your area.